Geogebra
Getting the best out of Geogebra
What is it?
I used to call Geogebra 'dynamic geometry software' and whilst it does perform this very well, to say that it is a piece of dynamic geometry software is rather underselling it. It does far more than that -
2D Graphing, Geometry, Spreadsheet, Statistics, Probability, CAS (Computer Algebra System), ...
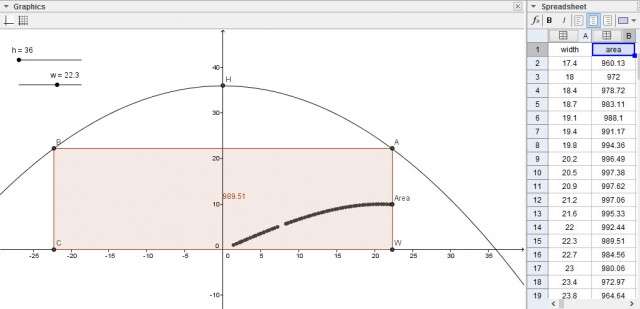
The beautiful thing is that it connects all these aspects together dynamically. The following example of a Calculus problem connects a geometrical image with a graph and captures the data in a spreadsheet.

Getting Started
Here are some top tips to ensure that the first experience you have using Geogebra in the classroom is a good one!
Downloading
Geogebra is a free piece of software. The current version of Geogebra 4 can be downloaded from ![]() here.
here.
Version 4.4 will have a more powerful CAS engine. A Beta version can be downloaded ![]() here.
here.
Version 5 is coming out in the near future. It adds 3D geometry and graphing. You can download a Beta version of the software from ![]() here.
here.
First Time
Unless you change the settings for Geogebra this is the page that will greet you every time you open up. It can be a little daunting the first time you see it and it's worthwhile understanding what each part of the window does before you get cracking.

Perspectives - you can hide and show this panel by clicking on the little arrow at the side of the screen. These perspectives are rather like suggested interfaces and settings from Geogebra depending on what you would like to do. For example, if you wanted to explore some circle theorem with students you might choose 'Geometry' whereas if you wanted to explore angles in triangles with primary students you might choose 'Basic Geometry' since they might find the simplified toolbar easier to deal with.
Algebra Window - rather like lifting the bonnet of a car this window allows you to uderstand what is going on in your applet. Plot a circle in another window and the equation of the circle appears in the algebra window. Plot a triangle in the graphics window and you'll see the coordinates of the 3 points, the lengths of the segments and the area of the triangle in the algebra window. When I'm designing an applet I always have this window open, but will often have it close it for students since it can look complicated and overawing!
Graphics Window - this is probably the window you will use most. Plotting graphs and constructing shapes can be viewed here. The arrow at the top of the screen allows you to hide/show the axes and a grid. Each time is a drop down menu. It is worth spending a few minutes familiarising yourself/playing with some of the different tool.
Toolbar - this menu changes depending on the window you are using. The graphics, spreadsheet and CAS toolbar menus are all different and reflect the tools that you would wish to have at you disposible depending what you are doing. You will notice that they are grouped in a handy manner e.g. all the measuring tools (angle, length, area and slope) go together.
Input bar - this is where you will type the equations when you want to plot a graph. It is also where you will control your variables and make calculations. All the ![]() commands can be typed here
commands can be typed here
Input help - useful for finding out about all the different functions and commands.
Projecting to the Class
Geogebra can be used as an investigation and a demonstration tool. If you are projecting your applet to your class you will need to ensure that you have the settings right otherwise the students at the back if the class might not enjoy it as much as they should. Here are some tips that I have picked over the years to help out.
- Depending on the quality of your projector you might like to consider reducing the screen resolution.
- I like to change the font size from 12pt to 18pt.
- Make good use of bright colours and increase the opacity of objects so that they look bolder.
- Labelling is useful but if every point, segment, polygon is labelled the screen soon gets rather too busy. Consider changing labelling 'no new objects' so that any object that you add doesn't have a label - you can always add them later.

- Don't put too many objects on the screen at once. You can easily create several separate applets.
- Go to the back of the classroom and have a look at your applet.

